Friday, March 30, 2012

Beet Rawvioli's


Beet rawvioli's stuffed with pine nut cheese, in a rosemary cream sauce and served with a mâche and pea shoot salad.

The rawvioli's were reasonably quick to make, other than the fact that the slicing of the beets was a total pain. I actually have a restaurant grade mandoline and I had difficulties getting consistant full beet slices. The beets were so hard that I had to push really hard on them against the slicer in order to slice a complete circle. Physically exhausting and a waste of the beets. This reason alone is probably enough for me to not attempt this recipe again. Its unfortunate because the cheese stuffing and sauce were good. In itself it was a great recipe, but technically it was hard to complete.


Fortunately in the end it was enjoyed by all, which is all one can aim for :)

Recipe from Living Raw Foods.

Hempseed Corn Chips


Modified recipe from Everyday Raw. I added hempseed because it adds a nutty crunchiness and because I like to throw in as much good stuff as possible!

Requires a high speed blender and dehydrator.

1 3/4 cups flax meal
4 cups frozen corn, thawed
1 1/3 cups water
2 1/2 tablespoons olive oil
1 tablespoon cumin
3/4 small red onion
1 clove garlic
1/4 tablespoon sea salt + more for sprinkling
1 tablespoon + 1 teaspoon lime juice
pinch cayenne
1 1/2 teaspoons chili powder

Put flax meal and hemp seeds in large bowl. Blend all remaining ingredients except chili powder in a high speed blender until smooth. Stir in flax meal, hemp seeds and cayenne. Spread 1 cup of mixture per 1 teflon lined dehydrator tray, each should be no more than 1/8 inch thick, and you should have about 4 trays worth.

Dehydrate at 104 degrees for 12-24 hours or until completely crispy. IMPORTANT, 30 minutes after you first place in dehydrator, score out triangles with a knife and sprinkle with salt. Also, half way through you can flip the chip mixture and carefully peel off the teflon sheet, and keep dehydrating.

These turned out great! Super crispy and of course amazing with guacamole.

Lime Mousse Tart

Made this recipe from Living Raw Foods last night. It's kinda like a key lime pie but creamier. I'm not gonna lie, it took me 2.5 hours...but once again, this book did not fail me. Totally worth it.

The recipe is for four small tart pans but I made one big tart and a few smaller ones in muffin tins, why not? I worked with what I had.

First the crust:


I lined the tart pan with seran wrap so that later, I can just lift it out.


and for the filling, a LOT of avocados and lime zest


boosh

Recipe from Raw Food, Real World.

Tuesday, March 27, 2012

Resources

I guess I have acquired quite a collection of raw food books over the last few years :)


If you are wanting a raw food primer, something that explains the why's and how's of raw food, I recommend only the best:

The 12 Steps to Raw Foods by Victoria Boutenko.

Written by one of the founders of the modern raw food movement. She raised her family raw and her kids grew up to write a few books of their own, particularly a great recipe book.

Their recipes are delicious and on the easier side to make as well. Most of the recipes don't require a lot of equipment. Any book from this family are informative and with your health priorities in mind.

Their mother Victoria, being raw for 18 years, has recently collaborated with 2 other longterm raw eaters about their experiences over the years, in a book called, Raw and Beyond. They share candid experiences on what worked and what didn't work and introduce a groundbreaking 80-95% raw or "high raw" diet perspective, in which they found to be healthier and more sustainable in the longterm. It focuses on getting more omega 3's and limiting omega 6 intake. I have found this book extremely important for anyone thinking of or practicing raw eating in the longterm.

If you want some more modern and innovative recipes, my current favorite recipe books are ones by Matthew Kenney, Sarma Melngailis and Ani Phyto.

Their recipes do call for ingredients that are a little harder to find and the use of more equipment, but I have found that everything I make from their recipes are super tasty and fun and refreshingly different from most raw recipes. But do keep in mind that the more gourmet/heavy the recipe is, the heavier the ingredients tend to be, such as nuts. Just as it is true to limit the amount you would consume of gourmet cooked food, the same is true for raw food.

Ginger Candied Pumpkin Seeds


yes!

Crunchy, made with maple syrup powder and sea salt, so they are both sweet and savory in a really good way.

Recipe from Raw Food, Real World

The Apothecary


its growing and it feels good

Energy Bars

I went for it and made these fancy, power packed bars.


Made from almonds, cashews, hemp seeds, flax seeds, cacao nibs, maca powder, goji berries, lemon zest and agave.

Super good! And full of good shit

Recipe from Everyday Raw

Entrées

Some entrées that I've tried my hand at recently:


Dill Burgers with onion rings and zucchini chips.

The burgers turned out really good, the zucchini chips too. The onion rings were good but you could only eat a few before you got a stomach ache (they were still raw onions after all, even though they were technically dehydrated).

Burger recipe from Fresh; The Ultimate Live Cookbook
Onion ring and zucchini chip recipes from Ani's Raw Food Essentials


Pimenton chive cashew cheese stuffed red bell peppers with pine nut dill raddichio slaw.

yummeeerrrsss

Recipe from Living Raw Food


Some greens and sprouted quinoa tabbouleh.

Tabbouleh was easy to make, tasty and kept well for a few days.

Recipe from Everyday Raw


"Baked" mac and cheese, aka yellow squash with cashew cheese and chopped walnuts.

Good when its fresh out of the dehydrator but it was hard to eat much of it just because I'm not a big fan of squash pastas.

Recipe from Everyday Raw


Raw tacos.

These were great, recipe makes a lot and it kept well several days. Beans made from sunflower seeds and mixed with a sun dried tomato paste, put in a flax seed corn tortilla and topped with quac.

Recipe from Raw Food, Real World, and online here.

I think this is when you know you're serious

Dessert

One of the reasons I love eating raw, is the desserts. So many good things you can eat and you don't have to worry about raising your glycemic levels and feeling like shit after.

Some things I've made:


Almond meal and coconut cookies with cacao chips.

I've made these several times, they always turn out good. They are basically like a chocolate chip cookie and a coconut macaroon combined.

Recipe from Ani's Raw Food Essentials, in which I added shredded coconut and vanilla


Cacao and coconut truffles.

Holy shit these were amazing and made me feel great.

Recipe from Living Raw Food


Mint cacao cashew ice cream.

I have to say, it didn't turn out to be that good. It wasn't bad, but not great either. I think next time, I would use a recipe that used coconut in it as well for a better overall flavor.

Receipe from Ani's Raw Food Essentials


Cacao Mousse.

Flavor was great but the texture was not so great. The irish moss that I used in this wouldn't break down all the way, so the texture was a little crunchy due to that :(

Receipe from I am Grateful


Cacao mint thins.

So. Good.

Recipe from Living Raw Food


Perfect for sundaes

I LOVE ordering dessert at raw restaurants, its my favorite part. Probably because desserts are my favorite in general. I have been to a lot of raw restaurants in LA and NY, and my fav desserts were definately at Pure Food and Wine in NYC.


So good I had to buy the recipe books and attempt to make some them myself.

Crêpes


Raw banana flax crepe with lemon cashew cream, agave, and blueberries. (Served with a mango, orange, grapefruit, lemon, banana, noni fruit smoothie)


Banana flax crepe with bananas and raw nutella!

This recipe for crepes is great, you can add whatever toppings you like.

2 bananas
1/2 cup flax meal
1/2 cup water.

Blend ingredients together in a blender and then spread evenly on a teflon lined dehydrator tray. Dehydrate at 104 degrees for 4-6 hours or until dry. The carefully peel off texflex sheets and cut into squares.

Raw without trying

You can always take ordinary fruits, veggies, and nuts and eat them as is. Or you can mix them up, soak them, puree' them, dehydrate them and you actually have lasting attention for this way of eating. I know for me, I eat raw because I feel the best I've ever felt, its just about keeping myself interested (and keeping others interested so I am not doing it on my own :)


Good raw food is all about knowing how to prepare something well.

But also its important to know how to eat something simple so you don't burn out. Not everyone wants to cook for every meal, same goes for raw foodists. We need easy, quick meals as well as more complex and interesting meals.

So I try to keep in mind that the simplest of things are super good too.


Like the salad. They never get old for me. There are so many variations you can do, just depends on what you got lying around. Load them up with veggies, nuts, seeds, avo, whatever


Add seaweed if you fancy, and a little tahini dressing


Eating avo with some salt and pepper and/or mustard on it can be the best snack ever. Throw in a little chopped tomato with cilantro and some olives, and you got yourself an easy and self explanatory raw meal.

Of course, the more time you have spent learning raw recipes and have certain things in stock from other recipes, it gets easier to whip something together. Also, sometimes all I need to do is think ahead and I can make something easy when I need to. For example, I know if I soak some wild rice for a couple days, I will have wild rice ready to eat without having to do much of anything.

Some more snacks that are easy to come by that are raw:

apples/celery/bananas with almond butter

carrot sticks

guacamole

almond milk, add cacao powder and agave!

saurkraut

kimchi

dried fruit

raw nuts


sometimes you just gotta eat!

Cheesy Kale Chips

This is one raw food snack that most non-raw people have tried. Its cheesy, crunchy and a satisfying snack that is genuinely great for you.

You can make them in an oven, but if you want to preserve the enzymes and get more nutrition from them, make them in a food dehydrator.

Recipe from goneraw.com, and altered how I like it:

Ingredients:
1 large bunch of curly, green kale, washed, large stems removed, torn into bite size pieces

COATING:
1 cup cashews, (soaked 2 hours)
1 red bell pepper, seeded and chopped
juice of 1 lemon
2 T. nutritional yeast
1/2 t. fine sea salt (use more or less to taste)

Preparation:
Put coating ingredients in a blender. Blend until smooth. Using your hands, massage coating onto kale pieces getting it inside of curls. Put on teflex lined dehydrator trays (don't worry about flattening them, they're better bunched up) and dehydrate at 105 overnight or until coating is dry. Slide onto regular mesh screens and dehydrate 12 hours, or until very crispy.


Monday, March 26, 2012

How to Open a Coconut

Holy crap, is this not a majorly under explained thing in raw food books!? I have definitely learned about opening coconuts the hard way and would love to save you a few steps.

First, the difference between coconuts.

Young Coconuts. Used for their water and SOFT meat. Most, if not ALL raw recipes call for this kind. The soft meat is great for smoothies, pies, puddings, sauces, dehydrated bacon, etc. The water is sweeter than mature coconuts and used in most coconut water products.


They are immature and therefore green, and have a thick soft skin around them. When you buy them from the store, the green outside is chopped down for you and you have a coconut with a cone top and a square bottom (which is very convenient for placing down on a table).


Mature Coconuts. Used for their water and HARD meat. The meat is shredded and used to make coconut milk or oil, or shredded and dehydrated for coconut flakes.


"Coconut milk, not to be confused with coconut water, is obtained primarily by extracting juice by pressing the grated coconut's white kernel or by passing hot water or milk through grated coconut, which extracts the oil and aromatic compounds. When refrigerated and left to set, coconut cream will rise to the top and separate from the milk. The milk can be used to produce virgin coconut oil by controlled heating and removal of the oil fraction."

(Store bought coconut milk and water are not raw unless specified due to how they are processed.)

I have mistakingly bought mature coconuts in situations when they were the only kind I could find, only to discover that the meat is so hard and difficult to remove, and NOT the right kind for the recipe I was making. They are fine for water of course (although not as sweet as the water from a younger coconut), but the meat was not what I was needing and I eventually threw away the rest of the coconut because I was unable to properly use it.

SO, if you are looking to open a coconut for water or for soft meat, get a YOUNG coconut. And here are some tips on how to open one a little easier. Alas, its still hard to do. I hate when books make it sound super easy, it's not!

You will need either a sharp chefs knife that you don't care much about:


or a SUPER sharp heavy duty cleaver:


First, the best lesson I ever learned (that a lot of books don't tell you), shave off the tip of the coconut! Shave down the top even more, you will feel the hard round cone below but shave off as much as you can. That way you have less to hack through.


Next, there are three ways to get into that fucker. One, straight chop off the whole top with a huge cleaver.
It can be done, I don't know how. I tried, and the only thing I accomplished was pissing off the neighbors below me.


Two, using the heel of the chefs knife:


find one of three ribs on the cone of the shaved coconut. Make a solid crack on the outside edge of one of them. From these three ribs, forms a round stress point, in which a natural round crack forms. So if you can poke through the edge of one of the ribs, you can pry your way aound the stress point, creating a lid to pry open. (AHHHH, WHAT?)


Three, hack slowly in a square formation around the tip until you crack through. This is the only way I've succeeded to get through. Its a slow and steady way, I feel more control of and the hacks aren't as loud. You will slowly crack a lid that can be pried open.


Important: Once you have a little crack, CAREFULLY pour out the water into a container! Don't loose that stuff. Or if you feel confident keeping the coconut steady, you can continue.

Take the tip of the knife, stick it through and pry open the rest of the lid. You can slide your knife side to side too, which can help.

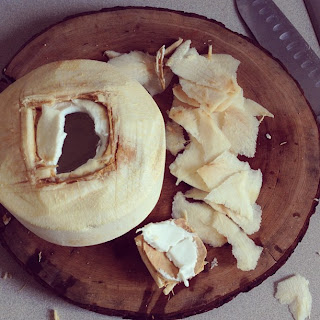
Once, you have poured out the water ,you can hack at the opening a little more and try to make it wider. Then you can scrape out the meat easier.


I like to do this by using the sharpest spoon I have, or even a sharp ice cream scoop, and scoop out the meat from the inside. Sometimes its super easy to do, and sometimes really hard. It all depends on how fresh the coconut is. So try to ask your produce dude how fresh that shit is, cause you might be cursing him later if you don't.

If the meat is harder than usual, you can put the coconut in the microwave for 30 secs or run under hot water, which helps loosen the meat. Either way, with TIME, it all works out.

Typically a young coconut yields 1/2 cup-1 cup meat

A lot of work it can seem like, but it you get the right, perfectly young and fresh coconut, it can actually, sort of, be easy. But either way, be prepared to spend some time on it cause you can't tell by looking at them how fresh they are (as far as I have found).

So as much as its been a pain in the ass to figure this all out, I'm glad I did, because some of my favorite recipes use coconuts.

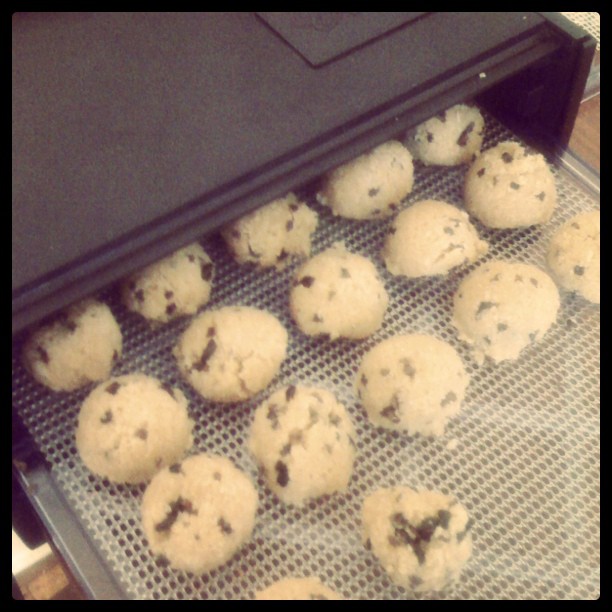
Such as, one of the best inventions ever, coconut BACON.

Can be made from the coconut meat if you were able to remove it in thicker strips. Then you just marinate it, and dehydrate it!


I used the recipe from Ani's Raw Food Essentials, pg. 76. I don't wanna non-consensually publish her recipe for free, sorry kids, but here's a similar recipe that was already published on the web!

The Juicer

It took me a while to invest in a juicer. I made crazy smoothies that scared people every morning as I drank them out of a spagetti jar.


Kale apple lemon smoothie, this was my stand by for a good year


Coconut, cacao, almond butter, goji, banana, cinnamon smoothie, aka dessert for bfast

You can make great smoothies with a blender but it feels like the next level when you can make your own juice at home. Now I can cram in a million more things in my juice every morning and continue scaring people with my pond scum colored concoctions.

I had to do some research to find the best juicer for what I wanted. In the raw food world, Champion Juicers were always the go to, due to its versatility and for being a cold press style juicer. It has the ability to switch out its screen for a solid plate and puree' foods into nut butters, pasta flours or sorbets, and its a slow chewing style of juicer, working like a cold press, as to preserve the enzymes (and not heat up the juice with any fast motors), which is what raw food is all about. But man were they a bitch to clean. I wanted all of the qualities of a Champion, in but in a smaller, easier to clean and more attractive package. And I wanted the ability to juice finer greens like wheat grasses, which the Champion can't handle (they sell a seperate attachment). I fortunately found everything I wanted in the Omega Nutrition Center Juicer line. I splurged and got the 8006, and its paid off already.


Its super easy to put together, it has a TEN year warranty and its fun to watch the magic happen within its clear tubes.


The juice gets seperated out from the pulp when the corkscrew squeezes the food through the screen. The juice goes through the screen and out the bottom, but everything else gets passed through to the end. The pulb btw, specifically veggie pulp is a great thing to add to raw cracker recipes to enrich them even more.

This has turned out to be my new daily juice:


Apple, carrot, ginger, celery, cucumber, kale, and chlorella powder, with the occasional cilantro, romaine/spinach/beet top/baby lettuce tossed in.

Recipe:

3 small apples or 2 large apples
4 med carrots
4 stalks of celery
1 cucumber
1/2 bunch kale
1/4 " chunk of ginger
1/2-1 tsp chlorella powder (optional, stirred into the juice at the end)

Chop everything down to fit into the juicer and put it on through. I split the juice in two and drink it over two days (I put them in two jars so they are ready to go). Stir in chlorella powder if you have it, 1/4-1/2 tsp in each jar if you split the juice, or 1/2-1 tsp if you keep it in one container, and then shake or stir it in.

In the end, its up to you what you prefer in terms of juicing or blending smoothies. I personally think both are great and I just enjoy having the option of being able to make either one. You can read a great article about the nutritional differences between juicing and blending here.